|
|
 |
 |
 |
 |
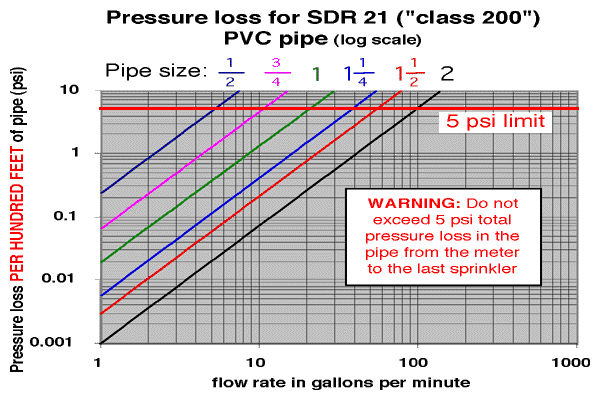
Pipe sizes, main line and valve locationsWe have an extensive list of FAQs (Frequently Asked Questions). If you have questions you don't see answered below, look for the answer in our FAQ section. In most installations the Main line starts after the backflow preventer and travels around the yard, passing each station valve. In areas where the ground does not freeze deeply, the valves should be located underground in valve boxes to protect the valves and wiring from UV exposure, lawn maintenance, recreation, vandalism and freezing temperatures. Avoid above ground manifold configurations, as they are subject to these problems and require substantially more large diameter pipes, larger trenches and are more expensive than distributed valve designs. Above ground manifold designs in southern climates are the hallmark of amateur designs, and in our opinion serve as the first warning sign of a bad design. Pipe pressure ratings: SDR pipe, often called "class pipe" is designed with a fixed ratio of wall thickness to diameter. By fixing this ratio, pipe of all diameters has the same pressure rating (a neat trick) unlike schedule 40 pipe. Most irrigators in southern climates use SDR 21 pipe, rated at 200 psi, for all pipe downstream of the valves. In the 1/2" size, a thickness ratio of 21 would result in pipe which would be too floppy to handle, so 1/2" pipe is commonly available in SDR 13.5, rated at 315 psi. The pressure rating of schedule 40 pipe varies with each size, but is higher than SDR 21 pipe in the smaller diameter sizes. See the figure below if you want to know what sort of pressure drop you'll have in your SDR 21 pipe. Add up the total flow rate for a given pipe, then read the pressure drop (in psi per hundred feet of pipe) for the pipe size you are using. In no case should you have a total pressure drop of more than 5 psi TOTAL from the meter to any sprinkler. If you can't readily figure this out you should have a professional design drawn up. You can't afford to screw up the pipe sizes, it's too critical.
This figure is a "log-log" graph. It allows us to show a much wider range of flow rates, pressure drops and pipe sizes than would be possible using a standard "linear" graph. There are only 8 subdivisions (minor tick marks) between major labels, not 9 as on a linear graph. Between the 10 gpm and the 100 gpm marks, for instance, are lines representing 20, 30, 40, 50, 60, 70, 80 and 90 gpm. Be careful when reading this graph if you are not used to "log-log" graphs! As an example, a 1" pipe flowing 10 gpm would have about 1.4 psi of pressure loss per hundred feet of length. If the pipe is only 20 feet long, then the pressure drop in that 20 foot pipe will be 1.4/100 * 20 = 0.28 psi. Pressure drop through fittings
Example: If you are reducing a 1 inch pipe to a 1/2 inch pipe using a reducing bushing, the reducing bushing has a pressure drop equivalent to a 1 inch pipe that is 7.7 feet long. Since the main line is usually fairly long, making it susceptible to water hammer effects, the main is usually sized up at least one pipe size larger than a shorter pipe for the same flow rate. This is very effective in reducing pressure drop, water velocity and water hammer. If you think that you can get higher pressure at the sprinklers by using smaller diameter pipe than suggested, you need to shake that silly idea out of your head before you get started. Sizing pipe too small is a great way to waste hundreds of dollars in parts and dozens of hours of hard work. We know people who have done this and they simply turned it all off and tried to forget they ever installed it. The thought of digging it all up and replacing the pipe was too demoralizing to even consider. We know of another guy who said "On my first system I used 3/4 inch pipe, but on the second one I used 1 inch pipe and it worked much better." Maybe on the third system he'll get it right. There's always hope! If you use 1 inch pipe everywhere, you are wasting a lot of money on lines with low flow rates, and 1 inch pipe is usually NOT BIG ENOUGH for a long main flowing water to a 12 gpm station! Use automatic drains only if you live in an area where the ground freezes in the winter. If you use automatic drain valves in warmer climates, they will provide no advantage, and they disguise small leaks in station valves by draining the water off where you can't see it. You'll never know you have a problem, but you'll waste lots of water. In very cold climates, winterize your system to be sure your pipes don't freeze. Links to continue to the next page are found at the bottom of this page.
 
| |||||||||||||||||||||||||||||||||||||||||||||||||||||||||||||||||||||||||||||||||||||||||||||||||||||